Migrated my Intel 7i7BNH NUC with Plex Media Server running Windows 10 to a VM on XCP-ng Xenserver hypervisor, with successful Intel Quick Sync (iGPU) passthrough
The NUC on Windows was serving the following:
- Plex Media Server
- Ubuntu Linux VM via VirtualBox
- Crashplan Pro via Docker
- Python test machine
- Linux bash maintenance scripts
- Home Assistant on Hassio
- For all Internet of Things gadgets at home
- Automation
Why not XCP-ng from the beginning?
Timing
NUC deployment was near to 3 years ago, being a Linux noob then (totally admitting this 😜), I wouldn't think of touching a hypervisor. Next was because Plex Media Server didn't support Linux GPU hardware transcoding then
Fast forward 2 years, with more experience in Linux in general, its time to migrate away from Windows and its frustrations
Windows 10 Frustrations
Cannot automount network drives
Years later, still can't automount Network Drives after a reboot (Malaysia house suffers from electrical blackouts)
You need to open the mounted drive in Explorer to make it connect, which leads to writing a command prompt script to open Explorer windows on the mounted drives. Oh wait, what if it fails? Does it retry quietly in the background like Linux fstab?
Say goodbye to your Plex Library items if you've enabled Auto Empty Trash in the Settings, and (un)lucky enough like me, the blackout somehow overlaps with your Empty Trash schedule. It happened to me once, but it was a small Library then...
VirtualBox VMs
Third VM onwards via VirtualBox becomes unresponsive after a random amount of time
- Pings/packets gets lost
Other Problems
I don't even want to bother typing out other problems
Windows is just a bag of problems
Tips & Info for XCP-ng/Xenserver
 Install XCP-ng on the NUCEXIF
Getting Ready
Post based on XCP-ng v8.1.0
Hardware/Software Required
- Keyboard
- USB or Bluetooth/Peripheral Wireless, personally I will stick to wired USB just in case the Bluetooth/Peripheral Wireless Dongle provided is not supported on CentOS
- USB Stick x1
- At least 16GB, try not to get overly large 64GB sticks
- If you have some VMware background, we are not running the Hypervisor OS on these sticks
- Stick is used one-time to install XCP-ng
- Any standard Monitor display x1
- NFS/CIFS(SMB) Network Share
- (Optional) Windows
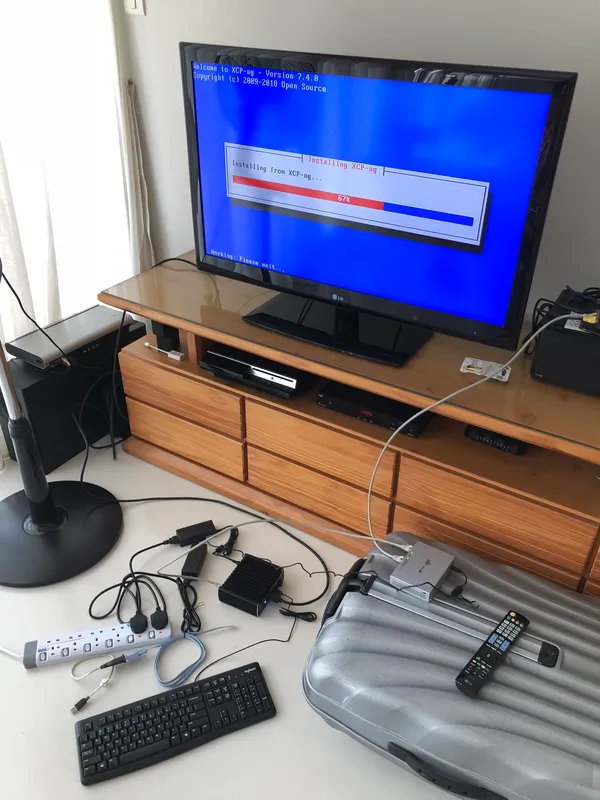
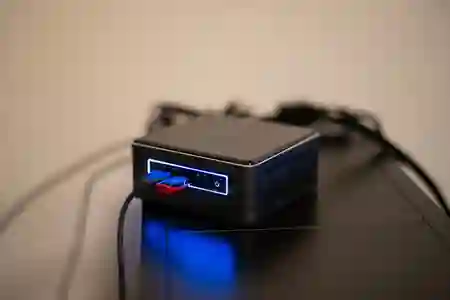
Get a USB keyboard and Monitor to work with the installation
This NUC is my 3rd or 4th deployment of XCP-ng, but the first deployment was hair plucking and I thought my hardware wasn't supported, as it just showed the screen below, without any changes and you're stuck there
 XCP-ng Installation stuck for console serial portEXIF
Turns out this is true for users trying to install via console serial ports, thinking that they could skip the keyboard and/or monitor =x
This has not been tested with latest version of XCP-ng. If it worked for you, leave a comment!
Prepare ISOs and NFS/CIFS
Download all the relevant ISOs that you plan to deploy, obviously including XCP-ng installation ISO. I won't write into detail here as it should come as something very simple if you plan to deploy VMs...
You will need an NFS/CIFS share with the ISOs, for XCP-ng to read from network, create an ISO Library share within XCP-ng, and start deploying the VMs
Enough with the obvious... let's dwell deeper and actually provide some useful information 😅
Plan your VMs' storage allocation
Taking my recent NUC migration, I over deployed my Plex VM Virtual Disk, rendering me unable to perform Delta Backups for my Plex VM
If you plan to deploy VMs, please cook up an Excel sheet and calculate how much storage space or memory you are allowed to work with before you share my almost-unrecoverable mistake/experience
This is important if you plan to backup your VMs on a schedule
Backups on Xenserver work with Snapshots
SR (Storage Repository) is your local/real/OS harddisk
Example for beginners new to the terminology:
XCP-ng Host has a 256GB SSD - This is your first Default SR, let's call this SR1
XCP-ng Host also has a 1TB HDD - This is your second SR, SR2
You deployed a 30GB VM VDI (Virtual Disk) on SR1. When you perform snapshots or Delta Backups, your Snapshot can only be saved on SR1 (SSD). You can't save the Snapshot on SR2 (HDD)
The only way to save on SR2, is to deploy/migrate your VM onto SR2
 XCP-ng SR In a glance
Update 2022/12/07
As my memories serve, my Intel NUC was using "thick-provisioned" storage
If you are starting out new, it is recommended to use "thin-provisioned" storage, which will save you lots of space when creating snapshots
My no-space issue will be more apparent if you set up your storage to use "thick-provisioned"
Read more XCP-ng - Storage
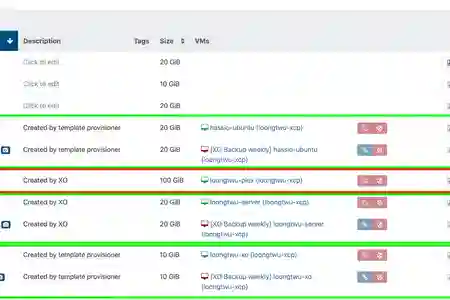
As a general rule of thumb for deployment, just make sure you prepare twice the amount of Virtual Disk storage for any single VM that you wish to deploy (Green box of screenshot)
Example
VM#1 - 30GB VDI (Virtual Disk) + 30GB Snapshot = 60GB (30GB usable)
Snapshot size will be the current used space/changed files in your VDI, so if you've used up 15GB of your 30GB, your Snapshot will have a size of 15GB. This is a very layman example, so don't take this as the definite answer for Snapshot size.
My NUC has a 256GB SSD, which becomes 182GB usable because of partition formatting, and usage by your XCP-ng Host
For my Plex VM boo-boo, I deployed a 100GB VDI planning for future Plex Library expansion, totally forgetting about the Snapshot disk space usage, and now I can't backup/snapshot my Plex because I do not have enough SR space
Solutions?
Because of COVID, getting a new bigger SSD seems like it's going to take some time before I could replace the current 256GB SSD. I have had a bad experience with M2 slot on the NUC, the initial M2 that came with the purchase died out on me within a year. Apparently its a heat issue, heatsinks are sold for these M2s, and I live in Malaysia, so it's summer forever
Solution #1 - Add a new physical SR
Expand current NUC harddisk options with M2, and just migrate the current Plex VM over to the bigger harddisk/SR2. Making and clearing enough space for my remaining VMs on SR1 to snapshot successfully (and some VMs still pending deployment!)
Pros - Only hardware addition downtime
Solution #2 - Replace SSD
Replace the current SSD with a bigger sized SSD
To prepare for this, from XCP-ng, I would need to backup all VMs entirely by exporting them as .xva, and then importing them back into XCP-ng after a fresh install
Why not clone the current SSD to the new SSD? Google around and it seems it's too much hassle and errors/corruption do happen. So the old export-import method seems to work for my small 256GB deployment
Cons - The downside to this option is that you will experience a longer downtime since you will need to shutdown the VMs, export, and import
Solution #3 - Start from scratch for the Plex VM with a smaller VDI
Another solution is to backup the Plex files, and start from scratch for the Plex VM with a smaller VDI
For solution #2 and #3, the Plex VM is definitely going to be re-created
Deploying Xen Orchestra
Why you might need Windows for XCP-ng Center
Most administration happens on Xen Orchestra (at least for me)
Here's the tricky part when you fresh-installed XCP-ng, you will need to use either the XCP-ng Center (only on Windows) or Xen Orchestra to deploy VMs
I have a Windows Desktop (for gaming) so I could easily use XCP-ng Center to login, deploy an Ubuntu18 VM used to build the Open Source version of Xen Orchestra (which gives you the Delta Backup and other features for free)
To build the Open Source Xen Orchestra, I just use this script which is as close as it gets to a one-click install (or one line copy/paste)
Jarli01's XenOrchestra Installer
Steps - if you have Windows
- Use XCP-ng Center to login
- Create your ISO Library if you have not
- Select the proper template for your choice of distribution of either Ubuntu16/18 or Debian (Server) VM
- with minimum 3GB of RAM - required by the script
- VDI (Virtual Disk) can be of the default as it does not take up too much space
- Run through the Installation by going to the Console
- (optional but helpful) Enable SSH Server during OS installation so that you can SSH in with your favourite Terminal/Putty and copy/paste commands
- Once you are up and running with your OS, follow the instructions on Jarli01's page, give it some time to build and once it's done, you can login with the default credentials
- Login to Xen Orchestra, change your default admin credentials, if not, create a new user with admin privileges, and delete the existing [email protected]
- Proceed to configure your connection to the XCP-ng host, remember to check "Unauthorized Certificates", click on "Enable" under Status and you are good to go
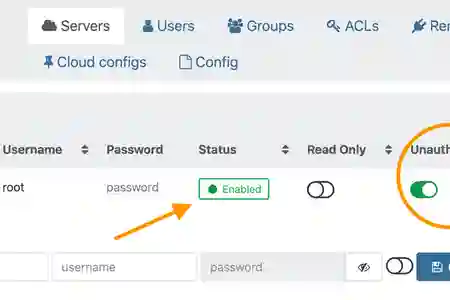 XCP-ng XO Server Connect
Steps - If you do not have Windows
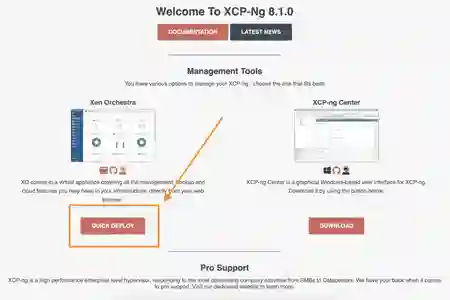
As this post is not a full tutorial, this method has not been tested. But I could imagine it should take you one more duplicate step/VM. You would deploy their One-Click install of XO by heading over to your XCP-ng Host's webpage, enter your XCP-ng host IP into your browser's URL and it will show you the "Welcome" page. Click on "Quick Deploy"
XenOrchestra Trial
 XCP-ng Quick Deploy XenOrchestra Trial
If you would like to continue building the Open Source version above because you would like to use the Delta Backup feature, you would use the Trial XO to deploy a VM used to build the Open Source version
In the end, you will have two XO VMs, x1 running the Trial version and x1 running the Open Source version
The steps are similar to the one above "Steps - if you have Windows", so I won't list the steps again. The only change is that you login to Trial Xen Orchestra, from there deploy a new VM, which has the same steps, just a different GUI
Once you have your Open Source XO running, you can proceed to remove the Trial XO version
Intel Quick Sync Video (iGPU) Passthrough works
Google seems to return very little results on iGPU compatibility, though there's an abundance for general GPU cards. I was sceptical on getting iGPU to work, which didn't really matter to me as I Direct Play most of my videos from Plex anyway
I can confirm that Intel Quick Sync Video (iGPU) works, and can be passthrough-ed from XCP-ng hypervisor to your Plex VM or any other VM
Getting your Intel Quick Sync passthrough-ed to your VM was simple
As XCP-ng host install itself, it will bind itself to the Intel Quick Sync hardware device, which enables you to see the Setup screen/Console
To be able to passthrough the iGPU to our Plex VM, we have to detach the iGPU from the host and attach it to the Plex VM, which means you will not be able to see the XCP-ng console
 XCP-ng Selecting the iGPU to passthrough to VMEXIF
As I was using the XCP-ng Center software, it was a matter of just detaching the GPU from the host, restart your XCP-ng host, and then attaching it to the Plex VM
For non-XCP-ng Center or Terminal users, here's the link to attach devices to VMs via the console of your XCP-ng Host
A quick check on Plex VM itself after attaching the iGPU
sudo lspci
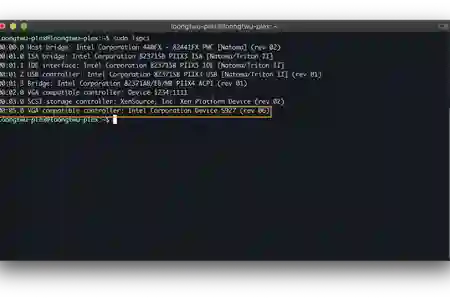 XCP-ng lspci
Shows the iGPU listed 🎉
And of course, a real run on the HW transcoding...
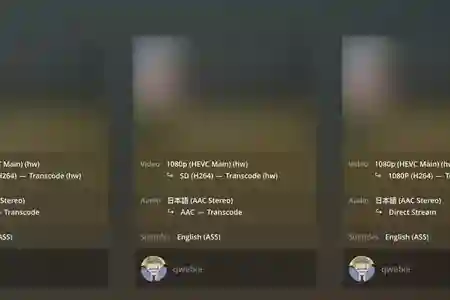 XCP-ng iGPU Passthrough Plex Hardware Transcode
This is not a review so I won't be benchmarking how many streams it can max out in comparison with a Windows machine
If you need to transcode to many users, just get a proper Desktop build with a capable graphics card