(Post) Setup / Optional(s)
Change the default admin password
Under Gear Settings Icon (Top right, left of Global Search) > Manage Users
Edit the current admin user and change its default password
Use SVG graphs
LibreNMS can output SVG graphs which has better clarity than png
Settings (Gear icon beside Search bar) >> Global Settings >> Webui Settings >> Graph settings >> graph type
custom.config.php
Back to the Terminal, we can set up custom settings to LibreNMS to exclude features like Billing and Services etc since we are not using them
cd /volume1/docker/librenms
vi custom.config.php
Google away on how to use vi as Synology do not have nano
Paste in the following example, which is heavily customised for Synology devices, change accordingly to LibreNMS's documentation
<?php

$config['show_locations'] = 1; # Enable Locations on menu
$config['show_locations_dropdown'] = 1; # Enable Locations dropdown on menu
$config['show_services'] = 0; # Enable Services on menu
$config['int_customers'] = 0; # Enable Customer Port Parsing
$config['summary_errors'] = 1; # Show Errored ports in summary boxes on the dashboard
$config['int_transit'] = 0; # Enable Transit Types
$config['int_peering'] = 0; # Enable Peering Types
$config['int_core'] = 0; # Enable Core Port Types
$config['int_l2tp'] = 0; # Enable L2TP Port Types
$config['force_ip_to_sysname'] = true;
$config['enable_bgp'] = 0; # Enable BGP session collection and display
$config['enable_syslog'] = 0; # Enable Syslog
$config['enable_inventory'] = 0; # Enable Inventory
$config['enable_pseudowires'] = 0; # Enable Pseudowires
$config['enable_vrfs'] = 0; # Enable VRFs
$config['enable_sla'] = 0; # Enable Cisco SLA collection and display
$config['bad_if_regexp'][] = '/^lo.*/'; // ignore loopback interface
$config['bad_if_regexp'][] = '/^docker[w]+$/'; // ignore docker interfaces
$config['ignore_mount_regexp'][] = "/^/volume1/@docker/.*/"; // Syno-NAS ignore docker mounts
$config['ignore_mount'][] = "/dev/shm"; // Syno-NAS
$config['ignore_mount_regexp'][] = "//run.*/"; // Syno-NAS
$config['ignore_mount'][] = "/sys/fs/cgroup"; // Syno-NAS
$config['ignore_mount'][] = "/tmp"; // Syno-NAS
After you have edited the custom.config.php to your liking, remember to perform a restart on your docker container to reflect the new settings
docker restart librenms
Alerts
As alerting will be out of the scope of this tutorial, I'm sure you can explore around and tinker with the settings. Email alerts will be sent out via SMTP with regards to using jarischaefer/docker-librenms's container
Just to list a few alert transports (or methods if you wish in the tech world) in LibreNMS if you wish to use other transports other than email:
- Pushover
- Discord (free)
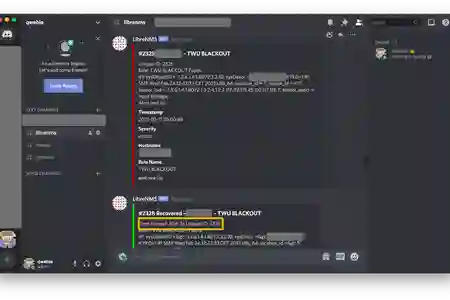 LibreNMS Discord Notifications
Alerts can be useful as they will notify you when something goes down and sends you a recovery message with elapsed downtime
Please do keep this in mind, if you are planning to monitor devices that often have downtime, it will make sense to have the LibreNMS installed on a location that is 24hours online with a stable Internet connection. If your LibreNMS server or Network goes down, how will it be able to send an alert to you?
My scenario with LibreNMS is that I have two LibreNMS instances installed at two different physical locations
One of the locations suffers from electrical power blackouts and unstable Internet connection, while the other location is located in a city with 24hrs electricity and no Internet downtime
The stable LibreNMS is used to monitor the Router of the unstable location and sends alerts when necessary
While not everyone has access to two or more physical locations, your only choice would be to set up a cloud hosted server Eg: DigitalOcean
Useful Commands
Having ran the above commands multiple times previously when I was still testing LibreNMS and configuration, so this should work as intended on a Synology NAS
If you come across any errors, it does not hurt to remove the Docker container, check the docker run command and run it again as it can be confusing with many docker variables
Docker
List all containers / Or view them in your DSM Docker app
docker ps -a
Check your current Docker gateway (your NAS IP when access from inside Docker)
docker inspect bridge
Start container from terminal
docker start container-name
Stop container from terminal
docker stop container-name
Remove container from terminal
docker rm container-name
Start a docker bash from terminal
docker exec -it container-name bash
Linux
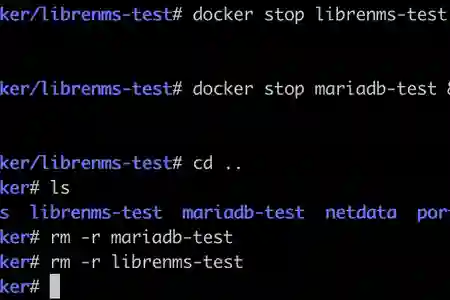
If you decide to remove any of the MariaDB or LibreNMS containers, remember to also remove the existing data from the persistent data folder eg: /volume1/docker/mariadb , /volume1/docker/librenms
rm -r foldername/
List files in directory
ls
rm -r mariadb/
rm -r librenms/
 Stop, Remove, Delete Docker containers
Networking issues
From your Syno terminal, ensure your Syno NAS can communicate with other devices (eg: ping). If your NAS is able to communicate with the devices, there are usually no problems with your docker commands as the docker network interface is bridged to your NAS. This usually boils down to device firewall that is blocking UDP port 161
Check Firewalls on Synology and Device(s)
Check your Synology & device firewalls, static routes, router settings etc to allow UDP port 161 SNMP protocol, especially true for remote polling of devices
VPNs
Router level Site-to-Site VPN users, most of the case the routes are automatically added for you by your Router. If you are using a 3rd party VPN connection on your Syno, please add the relevant static routing for more advanced networks (eg: multiple local subnets)
If you suspect your container is having problems, you can troubleshoot further by running a docker bash terminal (docker exec -it librenms bash), and try to ping your devices and/or perform a snmpwalk
Troubleshooting
Aug 24, 2018 Update
Open a LibreNMS container bash
- via Synology GUI
- via Portainer GUI >> Console
- Manually
docker exec -it librenms bash
Ping the device you wish to poll from the container bash
Eg: 192.168.1.20
ping 192.168.1.20
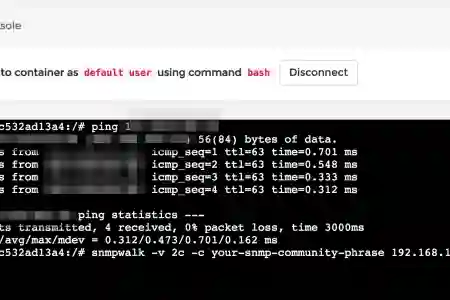 LibreNMS Bash troubleshoot ping
- If ping is successful, means your Synology and device is able to "talk" with each other. A big part of your network issue has been fixed. Usual cases are when Device A sends out to Device B (received), but Device B doesn't reply due to Firewall and/or OS restrictions. If you are unable to ping your device, you will need to check your Synology, router & device firewalls. Some device firewall by default will block ICMP ping
Testing SNMP udp port 161
Proceed to the next step to test your SNMP udp port 161
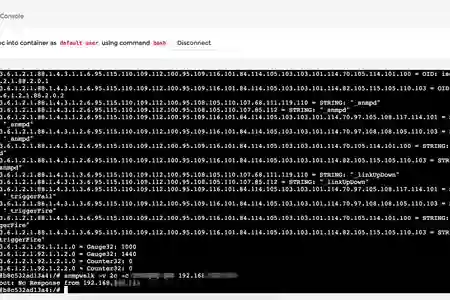
snmpwalk -v 2c -c your-community-passphrase 192.168.1.20
- Ensure device SNMP is enabled, check community passphrase and perform a snmpwalk on it Eg: 192.168.1.20 using v2c
- snmpwalk -v 2c -c your-community-passphrase 192.168.1.20
 LibreNMS Bash snmpwalk
- If it is successful, you will see a bunch of numbers
UDP 161 Unsuccessful and timeout
- Check device snmpd configuration eg:
/etc/snmp/snmpd.confor Windows's snmpd service and ensure it is allowing connections from certain IPs or set to allow all - Check device firewall configuration is accepting/allowing port udp 161
- Enable and Restart snmpd service
- Restart device
Synology & Docker Network 101
Context: Default Synology docker networking settings
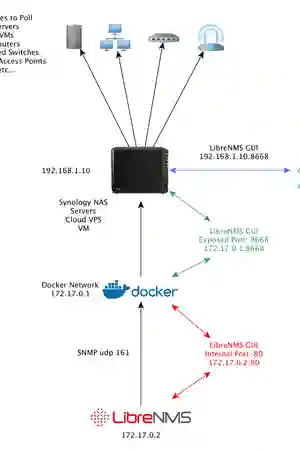 LibreNMS Docker Behind Synology Network Topology
local-syno-subnet eg: 192.168.1.0/24
syno communicate with other devices
syno: 192.168.1.10
devices: 192.168.1.20~
docker subnet 172.17.0.0/24
Communicating between docker containers can be done via their IPs or "--link" (which is deprecated in docker but is easier to setup and understand in this tutorial)
syno-docker: 172.17.0.1 (bridge gateway)
external-ip(your syno ip): 192.168.1.10
container1: 172.17.0.2 exposed-port: 1234 internal-port: 88 (eg: -p 1234:88)
container2: 172.17.0.3 exposed-port: 4567 internal-port: 99 (eg: -p 4567:99)
Devices subnet to communicate with docker containers
device: 192.168.1.20
device to container1 in syno: 192.168.1.10:1234 >> 172.17.0.2:88
device to container2 in syno: 192.168.1.10:4567 >> 172.17.0.3:99
note that you are still using syno's ip address instead of the 172.17.0.0 subnet
In layman's terms, the docker network is running inside your Syno NAS, which only your NAS can "see". External devices do not know that the docker network 172.17.0.1 exists
When external devices contact the relevant ports on your Syno NAS (1234, 4567), it will forward to the respective docker container IP and ports (88, 99)
Updating Containers
To update containers, there are three methods:
Synology
- Go to your Docker GUI in DSM
- Under the "Registry" tab, search for your image (in this case, jarischaefer)
- Click on "Download" and choose your tag (eg: latest)
- Wait for the download to complete, a notification will appear in your DSM
- Under "Container" tab, stop your current running LibreNMS container. (Right-click or click on the switch)
- Right-click on Container >> Action >> Clear
- Start LibreNMS container again
- The container will be updated with the newly downloaded image with previous "docker run" settings
Portainer
Portainer.io is a great lightweight docker management UI. There's nothing against Synology's own GUI docker management environment (sluggish at times...), but I prefer Portainer's environment as it has more details
Portainer also has the ability to open a bash console in your containers, all from the web UI!
When you explore through the different sections, you will find that you have many unused images created when you were testing with containers. You can use Portainer to remove the unused images and free some disk space. Moreover, when you see such details, you start to understand more on how Docker works
Installing Portainer
Create the necessary portainer folder in your docker directory eg: /volume1/docker/portainer
docker run -d -p 9000:9000 -v /var/run/docker.sock:/var/run/docker.sock -v /volume1/docker/portainer:/data --name portainer portainer/portainer-ce
- Login and setup admin user during first install, choose local environment eg: /var/run/docker.sock
- Go to the "Containers" section, choose the container you wish to update eg: librenms, and click on "Recreate"
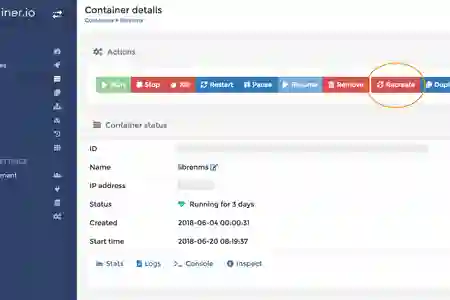 Portainer Recreate container
- A popup will appear with an option to pull the latest image during recreation
 Ensure “Pull latest image” is turned on
Note: If your container/image is not being updated, please make sure your container's image is not using a fixed tag. Eg: jarischaefer/docker-librenms:latest
Reduce/Minimum downtime during an upgrade
Aug 24, 2018 Update
If you were to "Recreate" via Portainer's GUI, you will experience longer downtime as Portainer will stop the container, and then pull the image. This is not ideal if the image is large or your WAN is not fast enough
To minimise downtime, you can pull the image in advance, and then proceed to "Recreate" via the GUI with the "Pull latest image" switch turned on. This step will be similar to the Manual steps below. This way, your only downtime is the restart of the container
- Navigate to "Images" section, choose your LibreNMS container ID
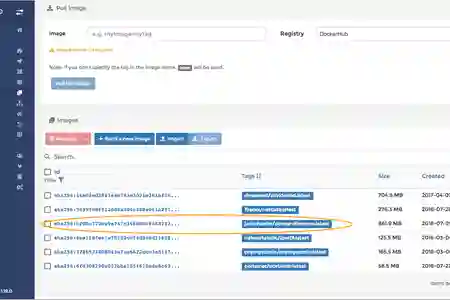 Portainer – LibreNMS image list
- Ensure the tag you wish to update to and proceed to pull the image
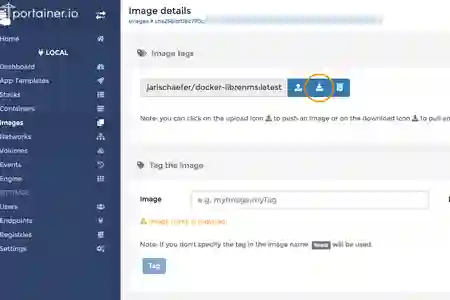 Portainer pull image before recreate
- Wait for the pull to complete, and proceed to "Recreate" the image (remember check "Pull latest image")
Manual Image Upgrade
Jun 23, 2018 Update - Highly recommend using Portainer management UI as above. Copying/Pasting commands can be a hassle if you run more than 5 containers
Applicable to Synology users and other systems (eg: Linux)
- SSH into your device
- Update the image
docker pull jarischaefer/docker-librenms:latest - Stop and remove the current running container
docker stop librenmsdocker rm librenms
- Paste your previous docker run commands
- docker run ... ...
After Care & Upgrade Errors
If you encounter problems like this after an upgrade eg: from earlier than v1.43 to newer than 1.43, or in general
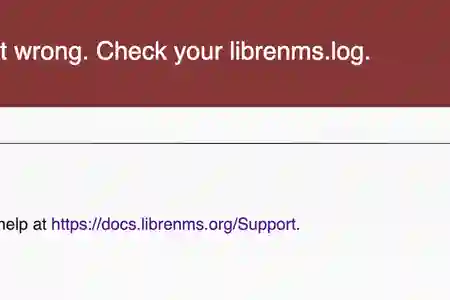 LibreNMS Error
Instructions from jarischaefer/docker-librenms
 Validate LibreNMS
Get to LibreNMS's container bash from Synology Console/Terminal or via Portainer
docker exec -it librenms bash
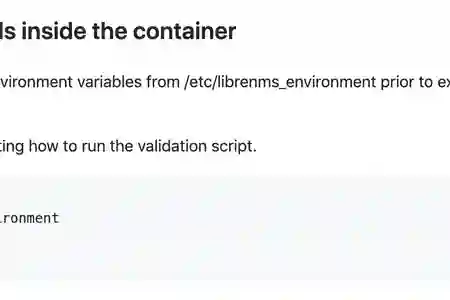
and run the following to validate your setup
su - librenms
source /etc/librenms_environment
cd /opt/librenms
php validate.php
And then follow, copy/paste LibreNMS's instructions to fix the problems, which are usually permission errors since we are running LibreNMS in a docker container, which complicates matters but safe to leave it
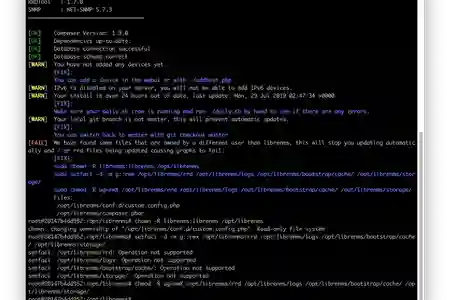 LibreNMS Validate results
Continue to Page 3. Afterword
Afterword Why Docker? One Point of Failure? SMBs/Enterprises Planning & Setting ahead Networking Set, Analyze & Forget Archive