Synology AirVideoHD Docker - Graphical Install without SSH
Posted On
2017 Jun 17
about 8 years ago
Updated On
2023 Jan 06
over 2 years ago
Aug 27, 2018 Update
Revisited this post to try to fix the workaround by applying read permissions to all users, which is not ideal if your NAS is shared with other users
Had fun with docker building, and found another image that works better than dmaxwell/airvideohd's, as the image was supposed to be used in unRAID other than Synology. More misc details on the Synology forums,
Tested on the following:
DMS version: 6.2-23739 Update 2
hdo26/airvideohd
Great thanks to both hdo26 and dmaxwell for providing the airvideohd docker images
As most of the installation steps are the same as before, I won't repeat the tutorial below. Just replace dmaxwell/airvideohd with
New tip
(Single User) If you have multiple shared folders and wish to add it to AirVideoHD, you do not need to edit the server.properties settings. Just add the shared folder(s) as a separate virtual mount in /videos
Eg:
Syno folder: /volume1/video1 Syno folder: /volume1/video2
Add the Syno shares as a subfolder in "/videos" mount during container creation
"/volume1/video1:/videos/videos in shared video1" "/volume1/video2:/videos/videos in shared video2"
This way, when you browse in AirVideoHD, you will see the following:
- videos
- videos in shared video1
- video files from a separate Syno share
- videos in shared video2
- video files from a separate Syno share
- videos in shared video1
This works if you are the only user, if you need a more specific configuration like multi-user, you still need to edit the server.properties file accordingly
It works now since the container have the proper permissions (docker) to read your video files
Moving on, post archive
As I've moved on to using Plex for better library management, this will be the last update to this post
Synology AirVideoHD Docker - Graphical Install without SSH
Installed on the following:
NAS: Synology DS916+ Version: DSM 6.1.2-15132
Requirements:
- Access to the DSM Desktop as administrator level
If you have not installed Docker on your Synology, please do so by installing it via the Package Centre.
dmaxwell/airvideohd hdo26/airvideohd
Under Docker's page, go to "Registry" and enter "airvideo" into the search bar and proceed to download "hdo26/airvideohd"
After it has been downloaded, click on Launch from the same Image tab
When shown with "Create container" settings page, change Container Name if you wish or just leave it
click on Advanced Settings
Advanced Settings >> check "Enable auto-restart" (self explanatory)
Volume tab
- Add and/or create the following folders for the File/Folder column by clicking on "Add Folder" button.
Column File/Folder - this is the "real"/existing locations/folder on your Synology
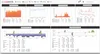
Mount path - "virtual" paths, this can be anything, but in this case, we have to set it to match hdo26/airvideohd's settings, shown in the picture above except for your media location for the Mount path of "/videos"
The /docker Shared Folder should be automatically created for you by Synology when you first install Docker. For simplicity, just install everything onto the /docker shared folder. If you do not want it to show up on your network shares, hide it in your Control Panel >> Shared Folder settings
Eg:
File/Folder = /anywhere/on-your-synology (Your media location)
Mount path = /videos ("/videos" do not change, keep it this way)
File/Folder = /docker/airvideohd/conversionpath (Self-created. You can change it to something else if you want like /temp)
Mount path = /conversionPath ("/conversionPath", case sensitive)
File/Folder = /docker/airvideohd/config (Self-created. As above for conversionpath)
Mount path = /config ("/config" do not change)
Adding more Media locations as you would normally do on your Desktop version of the AirVideoHD Server >> Bottom of this post
Network tab - local or WAN (host)?
Network >> check "Use the same network as Docker Host"
I chose to use host for the airvideo container as it does not give me any network problems that I might come across, especially when accessing via VPN. In a nutshell, if you set ports other than using "host", the server will only be reachable via a local network, and you need to fiddle other settings to allow access into your Docker container which is out of the scope of this tutorial. (That includes opening your router port forwarding etc)
Almost there...!
After you have created the container, the container should run automatically
Restart the container
Once it is running, proceed to restart the container by right-clicking the container, Action >> Restart
From your iOS device connected to the same network, enter the IP address of your Synology NAS and leave the port number unchanged (default: 45633)
Click on OK and save other settings. Refresh the media directory on your iOS devices and you should see your video folders load up
Congratulations! You have successfully installed AirVideoHD server on your Synology and you should be able to transcode/stream your videos onto your iOS devices
Note:
- Experience: Not always, but larger than >3GB, FLAC, HQ 1080p video files will tend to load and close itself during playback. As it works for my usage, I did not proceed further to diagnose the problem. I am guessing it is due to capabilities of the NAS
- 1080p HQ videos will take some time during load, but usually, streams fine during playback. Seek while playback will also take some time
Server Settings - PIN, Media Locations, Single-user password
Now, to the geeky part (but it is not difficult)
Finding your server PIN
While the airvideohd container is running, go to Docker >> Container >> double-click on the airvideohd container or select and then click on the "Details" button
Go to the Terminal tab >> click on "Create" (not on the small arrow)
and a new item called "bash" should appear below the "hdo26-airvideohd", select the new "bash" entry
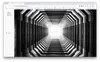
and you will be greeted with the following screen:
Type in the following command followed by an enter/return:
cd config/
(goes to the config folder)
cd logs/
(goes to the logs folder located inside config)
cat network.log | grep Generated
(shows network.log contents and filter only the term "Generated" note: Generated is case-sensitive)
It should return your airvideohd server PIN
Adding Media Locations & Single-user password & other settings - server.properties
Go back to the root folder by typing the following command (for simplicity sake, just go back to the starting point/root to avoid any wrong directories)
cd /
To view your server.properties file which is the home of your airvideohd settings, go back to the "config" folder
cd config/
cat server.properties
(shows your current server.properties settings)
Now to proceed to edit the server.properties file, type in the following command:
vi server.properties
To make changes to the file, press "i" (you should see a "-- INSERT --" at the bottom of the screen, and scroll down to the entry which you would like to edit by using the keyboard arrow keys
After you have changed your desired settings:
- Press "Esc" on your keyboard to exit "-- INSERT --" mode
- Type the following to save your server.properties file
:wqnote the colon (:) sign in front of letters (w) and (q)
After you have saved your settings, go back to Docker >> Container, choose the airvideohd container and restart it under Actions or just switch it off and on
More on Adding Media Locations
Did not test this by adding more locations as I have my files on one shared folder, but it should work by first stopping your airvideohd container, go to the settings page of the Container by clicking on "Edit" in your Docker >> Container page. Proceed to add your new Media Locations to the Volume mounts
Eg:
File/Folder = /media-location2 (this is your "real"/existing folder)
Mount point = /video2 (this is the "virtual" folder that you have created in your server.properties file, you need to point your "virtual" folder to your "real" folder. This mount point should be the same as the new media location you have entered in your server.properties file eg: /video2)
Archived content
Solution to "Could not load folder content - Access to file denied: /videos/"
"Could not load folder content, sorry :( "
Access to file denied: /videos/
The quickest way to fix this problem without dwelling deep into the details is to enable "Read" access to the "users" group. I am not a Linux veteran, so I don't know what should be the best settings used for this, or the default permissions for Docker when accessing shared folders on the Synology. If anyone knows what Docker's default user/permissions are, please do let me know in the comments!
Open File Station on your Synology Desktop and right-click on the "Media" folder that you have selected and choose "Properties"
Under the Permission tab >> Create >>
Choose from the list of user or group: users
and check "Read"