Tutorial for installing LibreNMS on Synology NAS via Docker to monitor SNMP enabled network devices
LibreNMS's official Docker instructions
Update - 27 Jun, 2026
With the introduction of AI 🤖, it can now generate Docker run commands and docker-compose.yml for you.
I am still going to keep this tutorial as published, as there is still useful/relevant information about Docker networking, as well as slight architectural decisions that I share on the other pages.
If you ever need a quick cheatsheet to understand how Docker networking works, and or some useful commands when you manually need to fix what the AI 🤖 f%$ked up:
Update - 07 Oct, 2023
Changelog
- Working LibreNMS tag for tutorial up till 23.5.0-1
- Adjust LibreNMS docker command to use 23.5.0-1
Versions
LibreNMS - 23.5.0 - Fri May 19 2023 23:32:19 GMT+0800 MariaDB Docker Container - 11.0.2-MariaDB-1:11.0.2+maria~ubu2204 Synology DSM - DSM 7.1.1-42962 Update 5
Users contributed to the update: miknl
Step by Step
It can be time-consuming to Google the web & forums for a straightforward answer, especially IT-related, where the replies you get either expect you to understand the acronyms/terms, or just point you in a "vague" direction
As with all tutorials, I can't possibly cover all aspects, but one thing is for sure: you will learn to "learn", if possible, in layman's easy-to-understand terms and finally give you a stable and working setup/environment example in the end
Some disclaimer: I am not a network/tech specialist. Tutorials written on my website all came from my personal experience, so it will suit the enthusiasts who want to learn more about networking without browsing multiple forums and to learn from practical examples
Requirements
The whole idea started when I bought the Synology 916+, so I will base the setup on installing in Syno NASes
- Main Requirement & Setup (This tutorial)
- Synology NAS model able to run the following:
- Package: Docker
- DSM SSH access
- Optional: Other SNMP enabled devices like Routers, Managed Switches, Workstations to list a few
- Synology NAS model able to run the following:
- My Devices
- Synology DS916+
- OSX - MacBook Pro
- What you will touch on
- DSM SSH access
- Terminal/Putty
- Docker
Who is this tutorial for
- Beginners & Enthusiasts
- Next to no experience in Linux, but willing to be adventurous
- SMB Owners, Managers, and Entrepreneurs who want to understand or DIY deploy their own NMS monitoring for company devices
- Home lab owners
- Linux veterans, why are you here?! ;)
Install Docker, Enable SSH & SNMP
Install Docker
Install the Docker app from DSM Package Center >> Search for "Docker"
This should be pretty straightforward
Enable SSH
Well, if you don't know how to SSH into your DSM. Let's begin by enabling SSH option in your Synology
Control Panel (Advanced Mode) >> Terminal & SNMP >> Check ☑️ Enable SSH service port: 22 (default 22, change if you wish accordingly)
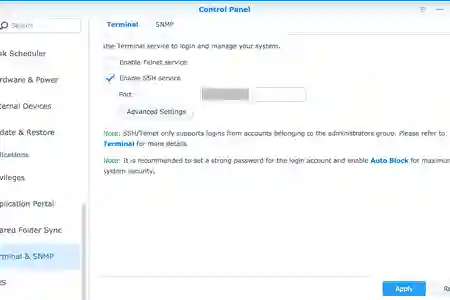 Enable SSH on Synology
Enable SNMP
Click on the SNMP tab Check ☑️ Enable SNMP service Check ☑️ SNMPv1, SNMPv2c service
Community: enter-something-here
SNMP Device Information Device Name: fill-in accordingly, usually NAS hostname Device Location: optional* fill-in accordingly, a vague location will do Contact: Email optional* useful for sending alerts from NMS, can also be changed in LibreNMS later
 Enable SNMP v2c
SSH into Syno NAS
Skip to next section if you already know this ;)
For Windows Users; please Google on how to SSH into your NAS using PowerShell putty
OSX Users
Open "Terminal" from your Mac and type in the following commands:
ssh user-with-admin-rights@your-nas-ip
If this is your first time, you should see a warning and be asking whether you would like to add the fingerprint, choose Yes by entering 'yes'
Enter your password and you should be greeted with the following output (With power comes great responsibility!)
 SSH via Terminal
Proceed to gain root access by typing
sudo -i
Enter password again and you will have root access. Now... let the fun begin!
Save your commands!!
- Test run of docker run commands
- Readability, ease of editing and substitute your values
- Docker container/image update **IMPORTANT**
- Docker by itself doesn't update the image as it's built that way. You can google and find many answers on this
- Go to Page 2 for Upgrading steps
Testing Purposes
Beginners
Beginners following this tutorial should just copy/paste the commands that I've posted on this page as is to minimise any errors/conflicts due to existing configurations, typos or if you are not very fluent in Linux
Get it to work in a testing environment first, then recreate the changes accordingly, like passwords, mounts and your own customisations, to secure your install further before using it for production (long-term, real-use)
Veterans / Homelabbers
I am currently using a distributed poller whereby my DigitalOcean droplet hosts the main LibreNMS poller and is connected via OpenVPN to the local subnet pollers that I am currently monitoring
If you want to take it further by using a reverse proxy like nginx or Traefik, this tutorial does not cover that. I don't intend to put LibreNMS behind a reverse proxy, as it complicates security with a public-facing subdomain and configuration. Although recently I started experimenting with nginx... ... for now I'm KISSing it :)
MariaDB Setup & Install
Prepare MariaDB Docker folders
By default, Synology docker should create a new shared folder for your docker container data. The default should be at /volume1/docker
Navigate to your docker folder
cd /volume1/docker
Next, create MariaDB folder
mkdir mariadb
Install MariaDB container
Let's pull/download the latest MariaDB image by running the command below
docker pull mariadb:latest
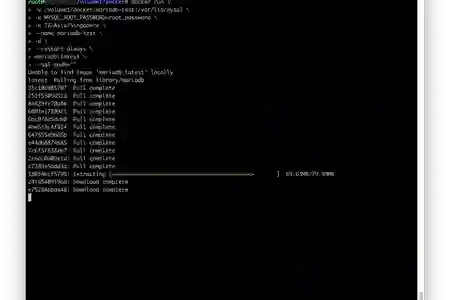 Installing MariaDB on Synology – missing the new updated MariaDB options in screenshot. Please make sure you use the commands above
docker run \
-v /volume1/docker/mariadb:/var/lib/mysql \
-e MYSQL_ROOT_PASSWORD='root_password' \
-e TZ=Asia/Singapore \
--name mariadb \
-d \
--restart always \
mariadb:latest \
--innodb_file_per_table=1 \
--lower_case_table_names=0
MariaDB Docker Details/Explanation
-v /volume1/docker/mariadb:/var/lib/mysql
Save persistent MariaDB database data onto our newly created mariadb folder under /volume1/docker
-e MYSQL_ROOT_PASSWORD='root_password'
-e TZ=Asia/Singapore
Replace timezone settings with your preferred timezone TZ Timezone List
--name mariadb
We name the container as "mariadb". Without this, Docker will randomly pick a name for your container
-d
Run the container in daemon/background
--restart always
Always restart the container. This docker container will restart itself if you were to reboot your Synology NAS. More options @ Docker's documentation
mariadb:latest
Use the latest mariadb image
--innodb_file_per_table=1 --lower_case_table_names=0
Run MariaDB with options as per official LibreNMS documentation
\
Indicates a newline, which makes it easier to read, you can also docker run commands without the newline, the above command will look like this one-liner without \:
docker run -v /volume1/docker/mariadb:/var/lib/mysql -e MYSQL_ROOT_PASSWORD='root_password' -e TZ=Asia/Singapore --name mariadb -d mariadb:latest --innodb_file_per_table=1 --lower_case_table_names=0
Setup MariaDB LibreNMS Database and User
Now that MariaDB has been installed, time to configure the database for use with LibreNMS
Before we proceed, please run the following to make sure that your database is ready to accept commands
docker logs -f mariadb
MariaDB container is still setting up your database
2023-06-25 15:06:54 0 [Warning] mariadbd: io_uring_queue_init() failed with ENOSYS: check seccomp filters, and the kernel version (newer than 5.1 required)
2023-06-25 15:06:54 0 [Warning] InnoDB: liburing disabled: falling back to innodb_use_native_aio=OFF
If you see the above, just wait for a few moments, the container will restart itself multiple times
Ready
When is it ready, you will see the similar output of the following:
2023-06-25 15:08:42 0 [Note] Server socket created on IP: '0.0.0.0'.
2023-06-25 15:08:42 0 [Note] Server socket created on IP: '::'.
2023-06-25 15:08:42 0 [Note] InnoDB: Buffer pool(s) load completed at 230625 15:08:42
2023-06-25 15:08:43 0 [Note] mariadbd: ready for connections.
Version: '11.0.2-MariaDB-1:11.0.2+maria~ubu2204'  socket: '/run/mysqld/mysqld.sock'  port: 3306  mariadb.org binary distribution
Since our database is ready, press Ctrl+C to end the logs session
Setup Permissions
Run the following command to log in to the SQL Console
docker exec -it mariadb mariadb -u root -p
Next, we will create a user for LibreNMS to use to read/write to MariaDB. We will create a user called librenms
CREATE DATABASE librenms CHARACTER SET utf8 COLLATE utf8_unicode_ci;
CREATE USER 'librenms'@'%' IDENTIFIED BY 'libre_password';
CREATE USER 'librenms'@'localhost' IDENTIFIED BY 'libre_password';
GRANT ALL PRIVILEGES ON librenms.* TO 'librenms'@'%';
FLUSH PRIVILEGES;
exit
Now that MariaDB has been configured, issue a restart to the MariaDB container
docker restart mariadb
 Create and Prepare MariaDB for LibreNMS
LibreNMS Setup & Install
Prepare LibreNMS Docker folders
Same deal, just different names :)
cd /volume1/docker
mkdir librenms
cd librenms
mkdir logs
mkdir rrd
touch custom.config.php
We created librenms folder, in it folder logs, rrd and custom.config.php file to be used by LibreNMS for any custom configuration
Generate an App Key
First, as per jarischaefer's instructions, we will generate an APP_KEY value to be used for our docker run command
Run the following to generate a base64 key
docker run --rm jarischaefer/docker-librenms generate_key
Copy/Save the base64 key, as we will need it to configure our LibreNMS container variables
Install LibreNMS Container
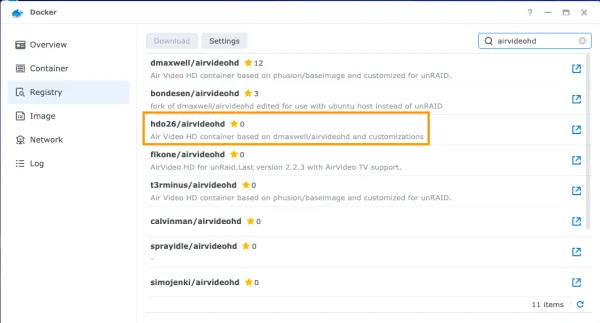
We are using jarischaefer/docker-librenms's container for this tutorial
Replace accordingly, mainly BASE_URL, APP_KEY and TZ
docker run \
-p 8668:80 \
-e DB_HOST=libredb \
-e DB_NAME=librenms \
-e DB_USER=librenms \
-e DB_PASS='libre_password' \
-e APP_KEY=base64:THE_GENERATED_KEY_ABOVE \
-e BASE_URL=http://YOUR_NAS_IP:8668 \
-e TZ=Asia/Singapore \
--link mariadb:libredb \
-v /volume1/docker/librenms/logs:/opt/librenms/logs \
-v /volume1/docker/librenms/rrd:/opt/librenms/rrd \
-v /volume1/docker/librenms/custom.config.php:/opt/librenms/conf.d/custom.config.php:ro \
--name librenms \
-d \
--restart always \
jarischaefer/docker-librenms:23.5.0-1
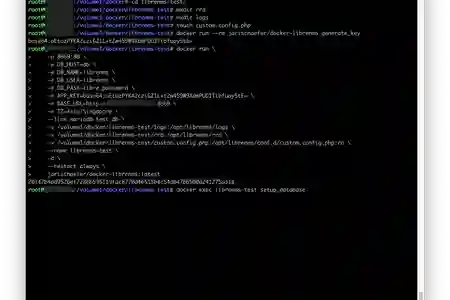 Installing LibreNMS Container
LibreNMS Docker Details/Explanation
-p 8668:80
Expose port 8668 which will be bound to the container's port 80
You can ignore this for now if you don't know what that means, head over to Page 2's Synology & Docker Network 101 Section to understand more later
-e DB_X=
DB_X values point to your MariaDB container created above; substitute them with the correct values
-e APP_KEY=base64:THE_GENERATED_KEY_ABOVE
-e BASE_URL=http://YOUR_NAS_IP:8668
Replace YOUR_NAS_IP with your Synology/Server IP address
-v /volume1/docker/librenms/custom.config.php:/opt/librenms/conf.d/custom.config.php:ro \
We mapped the file custom.config.php and set it with :ro "read only". This means that Docker only has read permissions to the file and will not be able to make changes to it
--link mariadb:libredb
We are assigning a hostname alias of 'libredb' to the container named 'mariadb' which we have just created above. DB_HOST is then set to libredb
Examples
--link your-existing-container-name:hostname-alias
Configure LibreNMS Database & User Creation
Preparing LibreNMS Database
Now that MariaDB and LibreNMS containers have been set up and are ready, let's instruct LibreNMS container to prepare (more like the ol' Setup/Install?) the Database for use
Run the following command
docker exec librenms setup_database
If you run into the following error:
Could not connect to database, check logs/librenms.log.
Wait for a few moments and try again
 Setup MariaDB database complete
Admin User Creation
Run the following command to add an admin to LibreNMS
docker exec librenms create_admin
We are almost done!
Login to LibreNMS by going to the following address in your browser:
Log in with the following:
Username: admin Password: admin
Add your Synology & Other Devices
Synology Device
Proceed to add your Synology NAS to LibreNMS for monitoring
Before we add your Synology device, let's find its IP when accessing from Docker
Run the following in Synology Terminal/Console (not the Container's bash)
docker inspect bridge | grep 'Gateway'
On the menu of LibreNMS, Devices >> Add Device
Substitute your above IP as the Hostname for the Device to add to LibreNMS for monitoring
Hostname: 172.17.0.1 SNMP Version: v2c Community: your-snmp-passphrase-created-above
LibreNMS will tell you that it has been successfully added
Not being updated
As LibreNMS polls on a cron schedule, you may not see your newly added Synology updated on the page.
To manually "Discover" your device and force the UI to update:
Go to the top menu "Devices" >> "Device Dependencies"
You should see your newly added Synology named as "172.17.0.1" or your Docker gateway
Click on the Device IP to show device information
Once you are in the Device page, proceed to click on the vertical-triple-dots, and then select "Capture"
Under the "Discovery" tab, click "Run", and you should see the discovery poller at work
Once it has stopped, you may proceed to click on "Devices" >> "Device Dependencies"
After the page is loaded, hover over the menu, and it should be updated to "All Devices" >> "Storage"
Congratulations!
You have a working NMS collecting and monitoring your SNMP enabled devices!
Adding Other Devices
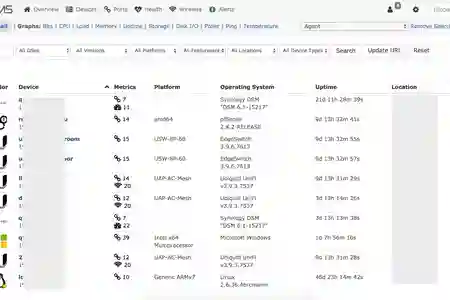 LibreNMS - Adding Devices
Proceed to add other SNMP enabled devices with their IP address as the hostname
Wait for around 5~10mins for it to collect data and it will output your graphs
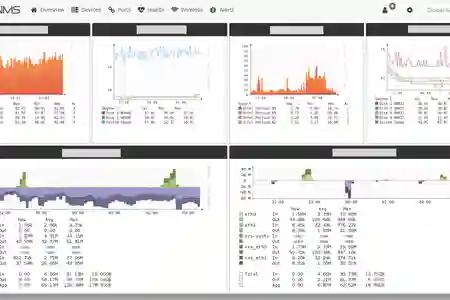 LibreNMS Dashboard
Let me know in the forums if this tutorial helped or, especially, if it didn't!
Continue to Page 2. Troubleshooting
(Post) Setup / Optional(s) Useful Commands Networking issues Troubleshooting Synology & Docker Network 101 Updating Containers After Care & Upgrade Errors